
Introducing the Four Section Exposure Circle
This post was updated 25 May 2015. I now use the term exposure time synonymous with shutter speed as exposure time corresponds better to the principles of the model.

Having worked as a photography teacher for many years I have tried out different methods for teaching my students the basics of photography. Like so many others I have often referred to, and have had some success with, the exposure triangle. An other model that has come in handy is the analogy of filling cups of different sizes (ISO-settings) with water (light) from a tap with different openings (apertures) within a certain period of time (exposure time/shutter speed), the water pressure in the pipe representing the available light.
Nevertheless, I have missed a model that could explain it all in one go, visually. That’s why I recently ended up developing the four section exposure circle (let’s name it FOURSEC for short). I don’t know if anybody else has done it. After I came up with the idea I’ve searched the internet for the same concept. So far I’ve only found a few other photographers that operate with a circle as a tool for explaining exposure, albeit all of them divide their circle, or «pie», into three sections representing the three settings that we find in the traditional exposure triangle: the ISO-setting, the aperture and the shutter speed (exposure time in my model).
In my FOURSEC, however, I have added the value of lighting. Thus my model includes the available light as a part of the picture (pun intended). This is nothing new when it comes to exposure, of course, and we find this value also in the «water-tap analogy», and probably also in other analogies and explanations. The big difference is that my model links the value of lighting to the three settings of the exposure triangle in one single visual presentation. After all, the available light will be the basic value in all photography situations and our choices for the three settings are always (if we cannot control the light) determined by it.
I believe the FOURSEC offers valuable help to beginners as it connects the exposure triangle settings directly to the actual photography situation. As the circle has to remain complete all the time, the model clearly shows that a change in the lighting necessitates an adjustment of at least one other setting, as well as allows for the adjustment of as many of the remaining settings as you wish. As a teacher I find this particularly beneficial when explaining the ISO-setting.
If the amount of light is decreasing, you can for instance increase the ISO-setting.

When reading fig. 1 and then fig. 2 we actually get a visual impression of the operation: the lighting section decreases while the ISO section increases. This visual impression should make the actual adjustment and the interaction of settings so much easier to understand and remember.Having increased the ISO-setting for operating in a darker environment, you might also want to reduce the exposure time to secure sharp images while working with your camera handheld. Now pretending that the sections representing lighting and ISO are fixed, the model tells us that in order to reduce the exposure time (section) we have to widen the aperture (section). Again the FOURSEC explains the situation perfectly (fig. 3).
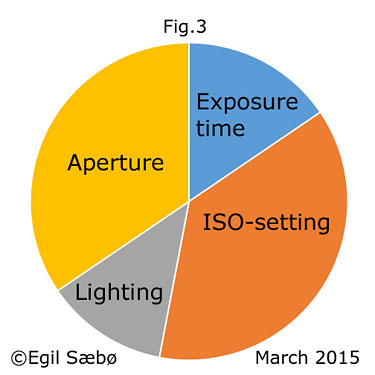
Please note that I by the term aperture refer to the actual opening and its physical size, not the f/number as the latter would not work in this model as a larger f/number means less light through the lens!
As a photography teacher I see the advantage of including the available light in the model also in the sense that it helps students to see that there is no such thing as the one correct combination of settings, neither in itself nor for a certain lighting situation. And if one should wonder, more or less available light must lead to a change in one or more settings. These facts are obvious to the experienced. To the beginners they are not. I know. I teach them, and I have been asked questions over and over again that I know this model will help answer.
It actually surprises me that I’ve never thought of this model before, or never have seen it developed by someone else. At the same time it doesn’t surprise me that much. Experienced photographers know things too well to see the issues from the beginners’ point of view. We do not see the blank spots in our explanations as we’ve already got the complete picture in our minds.
In addition to being a tool for teaching/learning exposure as such, the FOURSEC can be used for visualizing the settings for a photograph when explaining how the picture was taken (fig. 4 below).
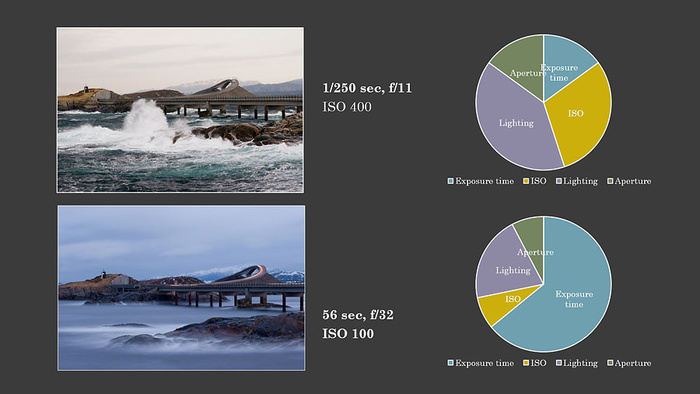
Fig. 4
It is important to note that the sections in the FOURSEC model cannot be compared to each other mathematically. The model does not work like a traditional statistics pie with sections derived from calculations based on one specific entity. Exposure time is measured in seconds. Apertures as such are measured in millimetres, and the value representing the camera’s sensitivity to light is, well ISO. Thus the FOURSEC is to be applied and read only as a symbolic reference to the lighting conditions and the camera settings.
I hope my Four Section Exposure Circle will be of help both to teachers and students of photography when facing the basic challenges of exposure.
See also this tutorial based on the model.

Legg igjen en kommentar